


Hi Everyone, Welcome to my docker certification revision guide/pointers blog. I have been working with monolithic applications for quite a long time. I didn’t get much opportunity to work with containerized and microservice applications. So I have decided to learn about containers. I believe in learning new technologies or tools by studying for certification. It helps me learn from scratch to deep dive. You can still learn technologies without a cert, but you might miss few internal details of a service/tool. The certifications study guide defines a clear learning path. My initial idea is to study for Kubernetes certification and then I thought to familiarize myself with dockers first. But I was in a dilemma before studying for docker certification. I have asked a few people for their opinion on docker certification. I got a mixed response. few people suggested you don’t need to have docker/container deep knowledge. On the other hand, suggested it is good to have a good understanding of dockers and commands.
Important Notes
Don’t use this study guide before finishing a few courses. I will refer to those course links in the last part of this study guide. Use this handbook as a final revision. I will not be explaining concepts like “What docker swarm/services/docker file”. I will only be adding key pointers to the exam.
My suggestion is don’t just do certification, after you finish your certification, build your own open-source projects. For example, I have recently cleared my terraform certification and after that, I have created my own lab project. Below is the link for that
nitheeshp.dev/series/terraform
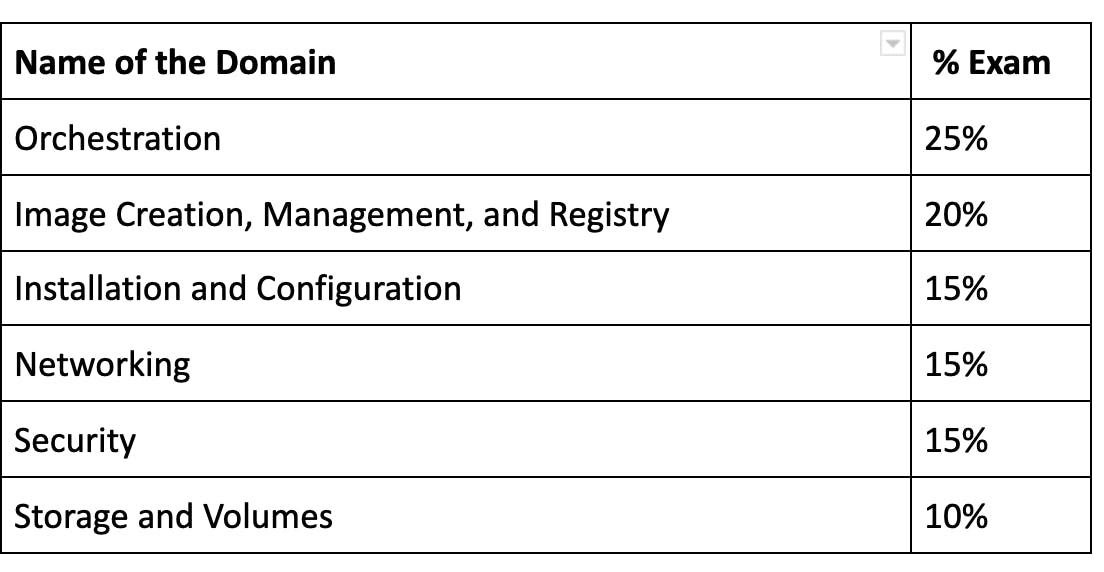
Key takeaways from this Exam
You will become a docker CLI ninja. You will have a clear understanding of different docker commands options and parameters
Learn about different docker orchestration tools - Docker Services, Compose, Swarm, Stack, and Kubernetes
Learn about different networking and storage options in docker
Understand the key difference between few concepts like
- BindMount and VolumeMount
- ADD and Copy Command in docker file
- CMD and EntryPoints
Learn about Mirantis Kubernetes Engine (formerly docker Enterprise/UCP).
Learn Mirantis Secure Registry (formerly Docker Trusted Registry).
You will learn the Basics of Kubernetes
- Pods
- Service Discovery
- Replicas
- Storage
- Pods
- Network Policies
- Deployment Types
- LoadBalancing options
Exam Details
55 questions and you will have 90 mins to complete. That is enough time to complete
- 13 multiple choice and 42 discrete options multiple-choice (DOMC) questions.
- In the exam, you will get 42 DOMC questions first and then 13 multiple-choice questions.
- 42 DOMC questions, no option to review later. That's why you will have enough time for this exam.
- 42 DOMC questions are a challenging part, you really need to be sure about your answer.
- In DOMC Instead of providing all of the options at one time to the exam taker,, options are randomly presented one at a time along with YES and NO buttons. For example bellow.
Traditional Multiple Choice Test
Which command place an image to a registry
- docker commit
- docker push
- docker images
- docker pull
DOMC displays one option randomly. If you press Yes, you will move on to the next question as your answer is wrong. Sometimes if the answer is right you might be presented with the next option like docker images (Yes/No).
- Which command place an image to the registry.
- docker pull (Yes/No)
- Which command place an image to the registry.
You can take this exam from your computer and results will be displayed immediately after your exam.
For exam you can use Windows and Mac Laptops . Linux OS is not supported.
Price for the Exam is $195 and 175 Euros excluding taxes. Including tax, it comes to around 214 Euros.
There are no mandatory prerequisites for this exam, but I would recommend 6 months of docker/Kubernetes work experience or 45 days of continuous study.
Certification is valid for 2 years.
You can schedule exam here - prod.examity.com/docker
Exam Modules
Orchestration Module
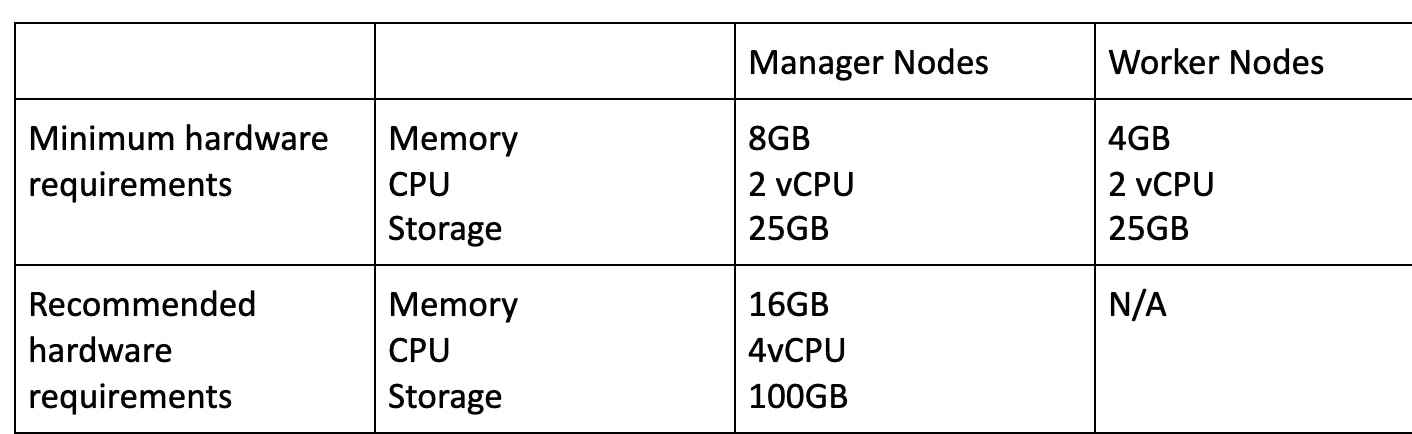
- Mirantis Kubernetes Engine (formerly docker Enterprise/UCP) hardware requirements
You can override the minimum requirement --force-minimums.
Require static IP on all cluster nodes. If you configure the DHCP option, it will not work.
UCP stores the data in the following path.
/var/lib/docker/volumes/<volume-name>_data
You can not run UCP on Hyper-V. You run multiple operating systems as virtual machines on Windows OS.
UCP support LDAP authentication and don’t support PAM authentication.
UCP backup container name.
docker/ucp
UCP back don’t backups image content, users, org, teams, and vulnerabilities database.
Ucp client bundle can be used to authenticate ucp using command line.
To change default orchestrator type from swarm(Default) to Kubernetes.
docker node update --label-add com.docker.ucp.orchestrator.kubernetes=true <node-id>
UCP provides three levels of audit logging
- Metadata
- Request
- None
DTR backup container name
docker/dtr
Features of DTR
- Image Scanning
- Image Signing
- Caching
- Image Life Cycle - Automatically clean up images based on policy controls
- Garbage collection
DTR Garbage collection automatically deletes unused image layers.
you can configure the DTR to automatically perform tag pruning on repositories that you manage by
- Specifying a tag pruning policy or alternatively
- Setting a tag limit
dtr-ol network allows UCP components running on different nodes to communicate to replicate ucp data.
Backing up the Swarm
- If swarm auto-lock is enabled, unlock the swarm cluster
- Stop the docker on the manager node
- Be sure to maintain the quorum of the swarm manager
- Backup the entire ”/var/lib/docker/swarm” directory
Restoring the swarm
- Shutdown docker on the target host machine for the restored swarm.
- Remove the contents of the /var/lib/docker/swarm directory on the new swarm
- Restore the /var/lib/docker/swarm directory with the contents of the backup.
- docker swarm init --force-new-cluster
Drain docker swarm manager node
docker node update --availability drain “node name”
Users are shared between ucp and dtr.
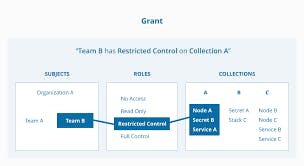
A grant is made up of a subject, a role, and a resource set.
Swarm uses 10.0.0.0/8 network as default address pool
Service constraints let you define criteria for a node to meet before the scheduler deploys a service to the node. You can apply constraints to the service based upon node attributes and metadata or engine metadata. For example
docker service create --name redis --constraint node.platform.os==linux --constraint node.labels.type==queue redis:3.0.6
- In the above example “node.platform.os” is default metadata for nodes and “node.labels.type” is a custom label applied on the node.
- Adding a label to the node
docker node update --label-add webapp nginx
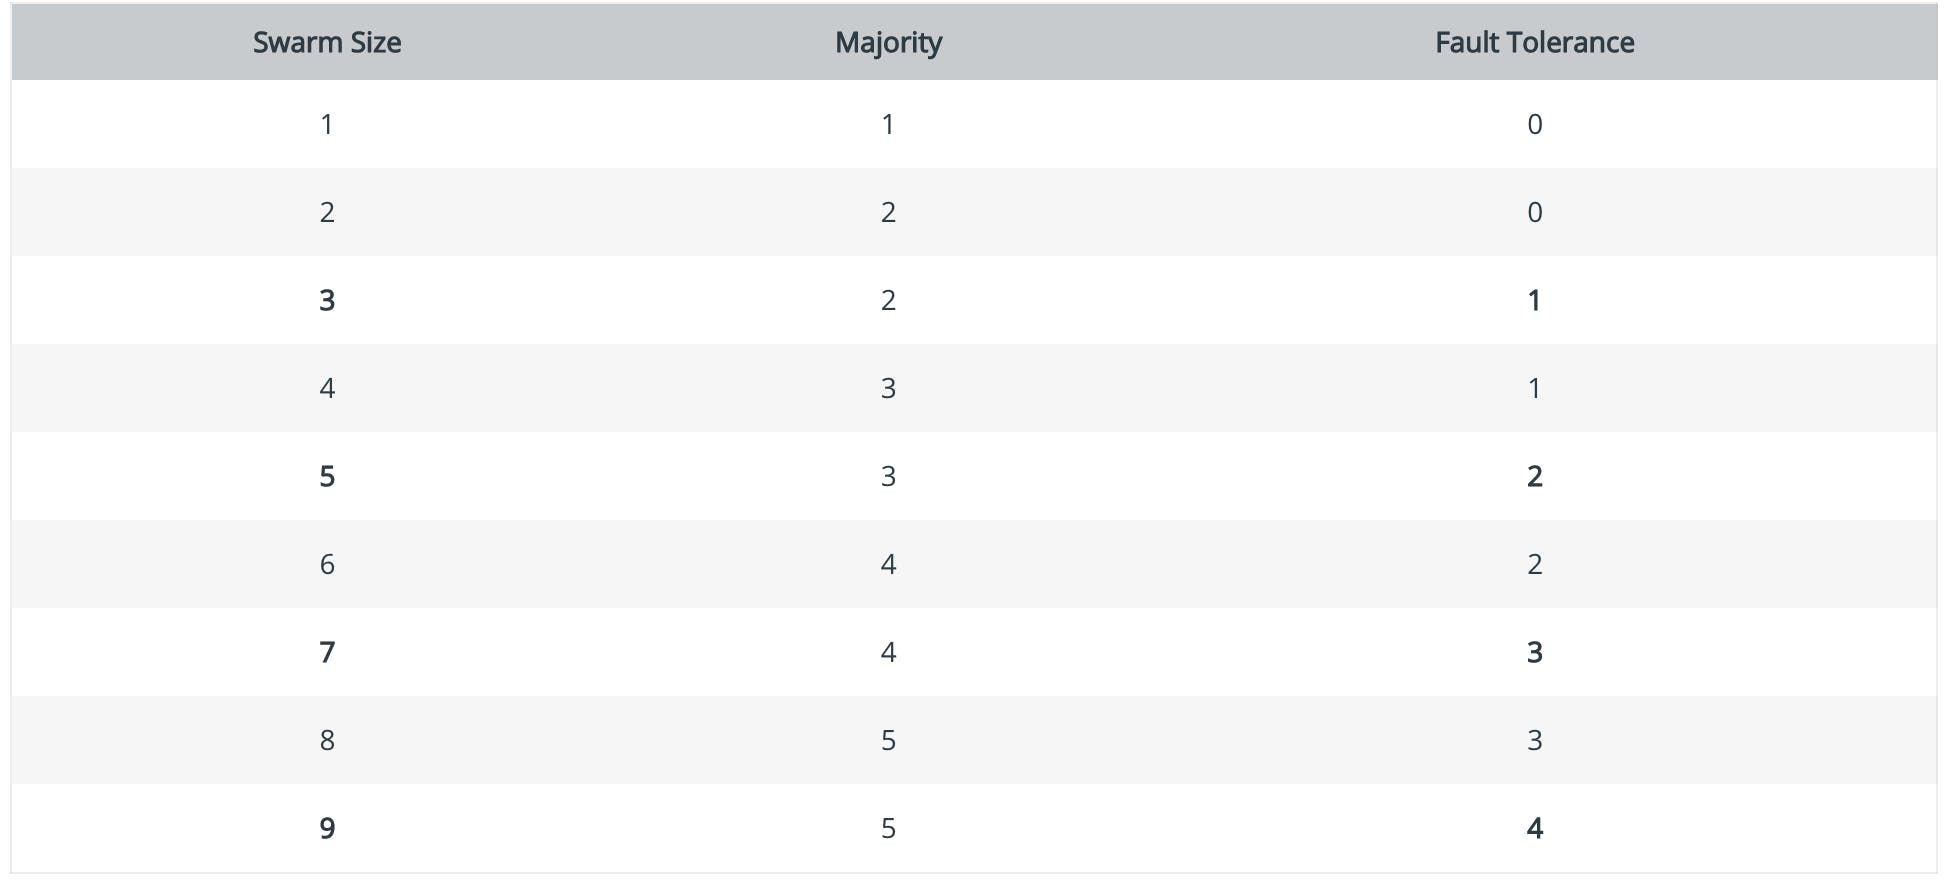
We should maintain an Odd Number of nodes within the swarm cluster. For example, if you have 3 managers, you can lose only one master node in the cluster. 5 manager node clusters can tolerate the failure of 2 nodes.
docker Quorum fault tolerance formula = (n-½) For example
- 5-1/2 = 2
- 3-½ = 1
- Having 7 master nodes, our quorum is 7+1/2 = 4 and fault tolerance 7–1/2 = 3
Below is the swarm cluster fault tolerance table
If you don’t specify any ports when exposing service outside the cluster then the default port would be “30000-32767”.
docker swarm Ports
- 2377 (TCP) ---> cluster management communication
- 7946 ( TCP and UDP ) ---> communication among nodes
- 4788 (UDP) --->overlay network traffic
Deploying docker Stack using compose file.
docker stack deploy -c “compose-file.yml”
- List services in the stack
docker stack services
- Creating swarm cluster
docker swarm init --advertise-addr 192.168.99.100
- Locking a swarm cluster when creating
docker swarm init --autolock
- Locking an existing swarm cluster
docker swarm update --autolock=true
- Viewing current unlock key from a running swarm cluster
docker swarm unlock-key
- Inspect a service on a swarm cluster
docker service inspect webapp
To list docker nodes in the swarm cluster
docker node ls
In a swarm only one leader at a time and multiple manage nodes
Scaling service in a swarm cluster
docker service scale webapp=50 or
docker service update --replicas=5 web
Difference between replicated and global services is that in global service only one container is deployed in each node.
Global service can be used to deploy logging/monitoring agents
Only difference between these commands is that with the docker service scale, you can scale multiple services together.
To check the history of a docker service
docker inspect <servicename>
- Updating docker secrets
docker service update –secret rm and secret add
- Adding new manager node to the swarm cluster
docker swarm join-token manager
- Adding new worker node to swarm cluster
docker swarm join-token worker
- To force new cluster
docker swarm init --force-new-cluster --advertise-addr <ip address>
docker info to view the current state of the swarm
Exposing service outside the swarm cluster
docker service create --name web --publish published=8080 target=80
- 8080 is the node port and 80 is the container port
Kubernetes Pointers
- Creating secrets in Kubernetes
kubectl create secret generic demo secret --from-literal=mysqlpass=test123
- Viewing a secrets
kubectl get secret demo secret -o yaml
ConfigMap can be used to store non-confidential data as key-value pairs
Pods Can use ConfigMaps as environment variables, cmd arguments, and as volume.
For Example
- Dev Environment app.env=dev, app.mem=2048m app.cpu=2vCPU
- Prod Environment app.env=prod,app.mem=4084m app.cpu=4vCPU
ConfileMap can be created as files,directory and literal values - More Details
You can use a daemon set if you want to deploy a single service on each node. It follows the “One Pod Per Node” Model. For example, if you would like to deploy log agents or security agents you can use a daemon set.
Kubernetes Architecture
kubectl is the command-line tool
Pods. The pod is similar to a group of Docker containers with shared namespaces and shared resources (Storage, Network, etc)
Mandatory field in a definition file
- apiVersion
- Kind
- Metadata
- Spec
Creating pod definaations
Kubectl create -f pod-definations.yml
- Listing pods
kubectl get pods
- Display all pods in the clusters
kubectl get pods --all-namespaces
- If you want get pods only development tagged nodes
kubectl get pods --all-namespaces -l env=development
- Listing Pod events (history)
kubectl describe pod my-pod
Health check options in Kubernetes
- Readiness probes - You can use this probe to know when the container is ready to start accepting traffic.
- Liveness probes - Checks if the app is alive. If a health check fails Kubernetes kills the containers and starts a new container
With Kubernetes network policies you can control the traffic flow at the ip address or port level
Safely drain a node
Kubectl drain <node name>
Image Creation, Management, and Registry - Module
- If you want to execute any command while running a container.
docker exec -it ubuntu bash
- Same applies to kubernetes container
kubectl exec -it ubuntu bash
- Execute commands inside running service in docker-compose
docker-compose exec api npm run db:migrate
- Pulling an image from Docker Registry. Here “nitheeshp” is my docker registry username and “nginx ” is the image name
docker pull nitheeshp/nginx
You can use .dockerignore to ignore files and directories to be excluded from the docker image
Access logs from the running container
docker container logs wordpress
- Accessing logs from running service in docker-compose
docker compose logs <service name>
- Stopping services in docker-compose
docker-compose down <servicename>
CMD and ENTRYPOINT are used to instruct docker what to do once the container started
COPY and ADD have some function copying the file But ADD some additional features like download from remote URL/git and extract files.
docker file best practices
docs.docker.com/develop/develop-images/dock.. docs.docker.com/develop/dev-best-practices
- Deleting all containers are not running
docker rm $(docker ps -a -q)
- Tagging docker image
docker tag SOURCE_IMAGE[:TAG] TARGET_IMAGE[:TAG]
docker tag nginx:v1 nginxnew:v1
- Push the image to the local registry
docker push localhost:5000/my-ubuntu
“docker system prune” Remove all unused containers
Docker multi-stage build copies artifacts previous stage docs.docker.com/develop/develop-images/mult..
To take advantage of build and speed up CI/CD pipeline, you can most frequently change.
Installation and Configuration
By default, once the docker daemon is stopped or crashes, all containers will be stopped as well. To change this behavior, set "live-restore: true" in /etc/docker/deamon.json config file.
docker search examples
This example displays images with a name containing ‘busybox’ and at least 3 stars:
docker search --filter stars=3 busybox
- This example displays images with a name containing ‘busybox’, at least 3 stars, and are official builds
docker search --filter is-official=true --filter stars=3 busybox
- By default, when the docker daemon terminates, it shuts down running containers. You can configure the daemon so that containers remain running if the daemon becomes unavailable.
File Path : /etc/docker/daemon.json and { "live-restore": true }
- You can enable debug mode in the file “ /etc/docker/daemon.json”
debug: true
docker export commands exports images into tar format and you can use “docker image load” to transfer images when there is no internet connection on the hosts.
docker can enforce hard limit and soft limit of resources usage(CPU, Memory) on the container.
docs.docker.com/config/containers/resource_..
- To check disk space used by docker image, containers, and volumes
docker system df
- To list volumes attached to containers
docker container inspect <ContainerName> (nginx)
HEALTHCHECK instruction in Docker allows us to tell the platform how to test that our application is healthy
HEALTHCHECK CMD curl --fail localhost || exit 1
That uses the curl command to make an HTTP request inside the container, which checks that the web app in the container does respond.It exits with a 0 if the response is good, or a 1 if not - which tells Docker the container is unhealthy.
Networking Modules
- By Default, network traffic between swarm clusters is not encrypted. To encrypt network traffic. You can below the command
docker network create --opt-encrypted --driver overlay
Only a user-defined network only be attached and detached
Ingress is the default network in a docker swarm.
pods on a node can communicate with all pods on all nodes
Third-party networking plugins
- cilium
- Flannel
- Calico
- Kube-router
Accessing Kubernetes services
NodePort: Exposes the Service on each Node's IP at a static port
- Can be used to expose applications to the public internet. For example, apache container
ClusterIP: Exposes the Service on a cluster-internal IP
- Internal network. can be used communication between frontend and backend container
Load balancer: Exposes the service externally using a cloud provider's load balancer.
docker default DNS is : 127.0.0.11
Adding custom DNS
docker run -it --name webapp --dns 8.8.8.8
docker networking driver
- Bridge - default network driver
- Host - user hosts networking directly
- Overlay - connects multiple docker daemons in different nodes
- Macvlan - allows assigns you to assign a MAC address to a container. useful for legacy applications
- None - disables all networking
Overlay networks are first created on the manager nodes. Then they are created on the worker nodes once a task is scheduled on the specific worker node.
Security Module
To ensure traffic between docker registry server and docker daemon is encrypted, you can certificate-based client-server authentication
A custom certificate is configured by creating a directory under /etc/docker/certs.d using the same name as the registry’s hostname, such as yourcompany.registry.com
Enable docker Trust. Established trust between docker registry and docker cli
export docker_CONTENT_TRUST=1
By default docker use “json” format logging driver
You can change the logging driver in /etc/docker/daemon.json
{“log-driver”: “splunk”}
NameSpaces isolates process
Supported Namespaces
- User - By default not enabled
- Process
- Network
- Mount
- Interprocess communication
Control groups responsible for accounting the limiting the resources such as CPU, Memory
Downloading self-signed images
- Edit the daemon.json file, whose default location is /etc/docker/daemon.json
{ "insecure-registries" : ["myregistrydomain.com:5000"]}
Or passing --insecure-registries flag while pulling a docker image
- By default docker runs containers “unprivileged” you can enable privileged by
docker container run --privileged --name=webapp nginx
Storage and Volumes Modules
Kubernetes storage access modes
- ReadWriteOnce -- the volume can be mounted as read-write by a single node
- ReadOnlyMany -- the volume can be mounted read-only by many nodes
- ReadWriteMany -- the volume can be mounted as read-write by many nodes
- Mount
- ReadWriteOncePod -- the volume can be mounted as read-write by a single Pod
docker Volume and BindMount
BindMount
- When you use a bind mount, a file or directory on the host machine is mounted into a container
docker service create --mount type=bind,src=<HOST-PATH>,dst=<CONTAINER-PATH> --name webapp nginx
Volumes
- volumes are completely managed by Docker.
- volumes are easier to back up or migrate bind mounts.
- works with both Windows and Linux containers.
docker service create --mount src=<VOLUME-NAME>,dst=<CONTAINER-PATH> --name webapp nginx
- Using volumes from existing containers in another container.
docker run -d --name=webapp2 --volumes-from=webapp1 webapp
- Using read-only volume
docker run -d --name=nginxtest --mount source=nginx-vol,destination=/usr/share/nginx/html,readonly nginx:latest
docker run -d --name=nginxtest -v nginx-vol:/usr/share/nginx/html:ro nginx:latest
The Kubernetes storage “retain” policy allows manual reclaim. You can manually reclaim the volume with the following steps.
- Delete the PersistentVolume.
- Manually clean up the data on the associated storage asset accordingly.
- create a new PersistentVolume with the storage asset definition.
When running device-mapper as storage in production use the direct-lvm option
Few More tips
- I would recommend studying a lot on Kubernetes storage (Persistent Volume, Persistent Volume Claim, Storage class, and Provisioners.
I would recommend two study courses
Study guide on github and reference links